
Building your own Shell
I always wanted to get my hands dirty with a operating systems project, so I finally did and set out to build my own shell. It was perfect choice: not too complex to scare soy-dev like me, yet rich enough to explore funamental concept of running a program via command line.
If you want to dive straight into the code, check out the full source here: GitHub Repo 🔥
Disclaimer: I am not a subject expert in systems programming. I am just sharing my findings.
Demo Video
What is a Shell
A shell is a command-line interface, i.e., instead of you clickity clackity on that mouse just enter a command and something happens on your computer, can be changing a folder or listing files and much more. Originating in the 1970s with the Unix shell, but now has many modern alternatives like Zsh and Fish, enhancing usability and scripting capabilities.
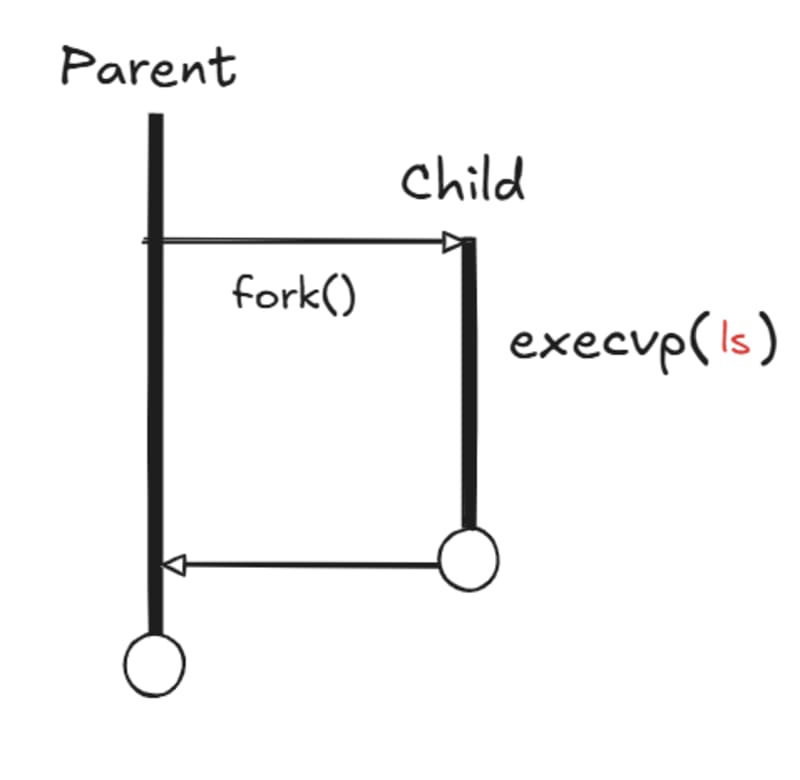
The Broad Picture

1️⃣ Start the shell → It shows a prompt and waits for user input.
2️⃣ User enters a command → The shell reads and tokenizes the input.
3️⃣ create a child process (fork()) → The child runs the command using execvp() .
4️⃣ Parent process waits (wait()) → Ensures the command finishes before taking new input.
5️⃣ Repeat until user exits → The loop continues, keeping the shell running.
NOTE - execvp() runs programs by searching for their executable file in the directories listed in the $PATH environment variable ( this includes system binaries and any custom programs installed in user-defined locations )
Lets Start with the Loop
The fundamental part of any shell is an infinite loop that keeps the shell running until the user decides to exit.
void loop() {
    int quit = 0;

    do {
        // Take Input
    } while (!quit);
}

int main() {
    loop();
    return 0;
}
Taking Input
Now that we have an infinite loop running, the next step is to take user input so the shell can process commands.
void loop() {
    char input[100]; // Buffer to store user input
    int quit = 0;

    do {
        printf("voshi> "); // Display the prompt
        fgets(input, sizeof(input), stdin); // Read user input

        // Trim the newline character
        input[strcspn(input, "\n")] = '\0';

        // Check for exit command
        if (strcmp(input, "exit") == 0) {
            quit = 1;
        }

    } while (!quit);
}

int main() {
    loop();
    return 0;
}
Execute User Command
Now that we have an infinite loop and can take input, the next step is to execute user commands
To run commands like ls, echo, mkdir (in case of linux), we need to:
- Create a Child Process using fork()
- Replace it with the command execvp()
- Make the parent wait until the command finished wait()
#include <stdio.h>
#include <stdlib.h>
#include <unistd.h>
#include <string.h>
#include <sys/wait.h>

void loop() {
    char input[100];
    int quit = 0;

    do {
        printf("voshi> ");
        fgets(input, sizeof(input), stdin);
        input[strcspn(input, "\n")] = '\0'; // Remove newline

        if (strcmp(input, "exit") == 0) {
            quit = 1;
            continue;
        }

        // Fork a process to run the command
        pid_t pid = fork();
        if (pid == 0) { // Child process
            char *args[] = {input, NULL}; // Prepare command
            execvp(args[0], args);
            perror("exec failed"); // If command fails
            exit(1);
        } else { // Parent process
            wait(NULL); // Wait for child to finish
        }

    } while (!quit);
}

int main() {
    loop();
    return 0;
}
Advanced Features
History
A terminal can operate in two modes when accepting input from the user:
- Canonical Mode (Line-Buffered Mode): The terminal buffers input until the user presses Enter (\n), then sends the entire line to the program.
- Raw Mode (Character-Buffered Mode): Every keystroke is sent immediately to the program without waiting for enter.
We can also use GNU Readline, which operates in canonical mode but also gives us command history using arrow keys, which otherwise we would have to do it ourselves by enabling raw mode.
#include <readline/readline.h>
#include <readline/history.h>

void loop() {
    char *input;
    int quit = 0;

    using_history(); // Enable history tracking

		do{
   		input = readline("voshi> ");

   		add_history(input); // Store command in history

   		// Rest of the code
Custom Prompts
We can even show current directory we are present in like most shells do.
char *get_prompt() {
    static char prompt[PATH_MAX + 50]; // Store formatted prompt
    char cwd[PATH_MAX];

    if (getcwd(cwd, sizeof(cwd)) == NULL) {
        perror("getcwd failed");
        return "voshi> ";
    }

    snprintf(prompt, sizeof(prompt), "\033[1;32m%s\033[0m voshi> ", cwd);
    return prompt;
}
Now just have to modify the input taking to use
input = readline(get_prompt());
Git branches
When working on projects, developers often switch branches. Displaying the active Git branch in the prompt would makes it easier to track the current context without running git branch manually.
Use git rev-parse --abbrev-ref HEAD 2>/dev/null to get current branch and popen() to capture the output.
char *get_git_branch() {
    static char branch[100];
    FILE *fp = popen("git rev-parse --abbrev-ref HEAD 2>/dev/null", "r");
    if (!fp) return "";

    if (fgets(branch, sizeof(branch), fp) != NULL) {
        branch[strcspn(branch, "\n")] = '\0'; // Remove newline
    }
    pclose(fp);
    return branch;
}
Now while creating a prompt you can add the line to put git branch
char *get_prompt() {
 // ... Prev Code

char *git_branch = get_git_branch();
snprintf(prompt, sizeof(prompt), "\033[1;32m%s \033[1;34m(%s)\033[0m voshi> ", cwd, git_branch);
}
SIGINT Handling (Ctrl+C)
When using a shell, pressing Ctrl+C sends the SIGINT (Signal Interrupt) to terminate a running process. To ensure graceful handling, instead of abruptly killing the shell, we can override the default behavior using a custom signal handler.
void sigint_handler(int signo) {
    if (signo == SIGINT) {
        printf("\n\n\033[1;31mUse \"exit\" to quit voshi.\033[0m\n");
        fflush(stdout);
    }
}


int main() {
    signal(SIGINT, sigint_handler); // Register custom SIGINT handler
    // Rest of the code
    // ...
}
Conclusion
Creating a shell is a fantastic way to understand operating system internals, process management, and input handling.
Furthermore you can add tab completions, background process, job control and many more features to your custom shell, as for my case I added a dashboard, a place that gives me weather, hackernews & techcrunch news. You can download my shell from the website or read the codebase from github repo.
Thanks to Indradhanush Gupta for making this a possibility !